
1.Zabbix主动模式
Zabbix官方文档:https://www.zabbix.com/documentation/3.0/
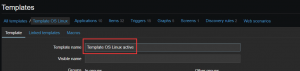
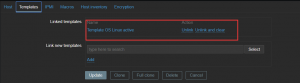
创建主动模板

全新克隆

更改名称
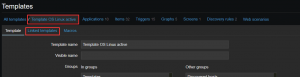
点击添加


全部选中

批量更新

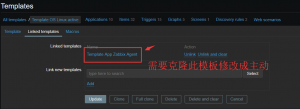
修改字符类型之后更新

之后还有几项不是active模式,是应为模板还连接了模板
克隆修改此模板,修改方式同上
#修改配置文件
[root@linux-node2 ~]# grep "^[a-Z]" /etc/zabbix/zabbix_agentd.conf
PidFile=/var/run/zabbix/zabbix_agentd.pid
LogFile=/var/log/zabbix/zabbix_agentd.log
LogFileSize=0
StartAgents=0   #不监控端口
ServerActive=118.190.201.11
HostnameItem=system.hostname
Timeout=15
Include=/etc/zabbix/zabbix_agentd.d/*.conf
#重启服务
[root@linux-node2 ~]# systemctl restart zabbix-agent.service
1.1添加主机模板

主动模式的主机名必须相对应
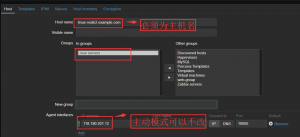
添加模板进行关联,然后添加
模板连接模板

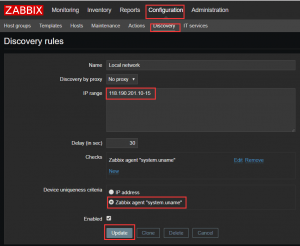
修改discovery模式为主动模式

1.2Zabbix主动、被动、trapper模式的区别
zabbix agent检测分为主动(agent active)和被动(agent)两种形式,主动与被动的说法均是相对于agent来讨论的。简单说明一下主动与被动的区别如下:
1.主动:agent请求server获取主动的监控项列表,并主动将监控项内需要检测的数据提交给server/proxy
2.被动:server向agent请求获取监控项的数据,agent返回数据。
说明:
使用zabbix代理有很多好处,一方面可以监控不可达的远程区域;另一方面当监控项目数以万计的时候使用代理可以有效分担zabbix server压力,也简化分布式监控的维护。
具体:
主动、被动模式都是相对于proxy来说的。proxy主动发送数据就是主动模式;proxy等待server的请求,再发送数据就是被动模式。因为主动模式可以有效减轻zabbix server压力,需要监控的东西很多时一定要把监控模式更改为主动监控
被动模式流程,被动模式一定要记得设置Server = ServerIP
被动模式工作流程:
Server 打开一个TCP连接
Server发送一个key 为agent.ping
Agent接受这个请求,然后响应< HEADER >< DATALEN >
Server对接受到的数据进行处理
TCP连接关闭
主动模式流程,主动模式一定要记得设置ServerActive=ServerIP
Agent向Server建立一个TCP连接
Agent请求需要检测的数据列表
Server响应Agent,发送一个Items列表
Agent允许响应
TCP连接完成本次会话关闭
Agent开始周期性地收集数据
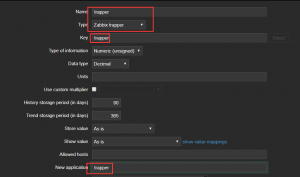
3.trapper模式:自定义Items不需要定义时间间隔
#配置trapper需要zabbix-sender软件包
[root@linux-node2 ~]# rpm -ivh https://mirrors.aliyun.com/zabbix/zabbix/3.0/rhel/7/x86_64/zabbix-sender-3.0.8-2.el7.x86_64.rpm
#查看帮助
[root@linux-node2 ~]# zabbix_sender --help
[root@linux-node2 ~]# zabbix_sender -z 118.190.201.11 -s "TCP_Status" -k trapper -o 43 #-s主机名称
info from server: "processed: 1; failed: 0;
total: 1; seconds spent: 0.000523" sent: 1;
skipped: 0; total: 1
自定义一个监控项trapper的Item

trapper模板
2.自动化监控网络发现
#配置文件内容
[root@linux-node2 ~]# grep '^[a-Z]' /etc/zabbix/zabbix_agentd.conf
PidFile=/var/run/zabbix/zabbix_agentd.pid
LogFile=/var/log/zabbix/zabbix_agentd.log
LogFileSize=0
DebugLevel=5
Server=118.190.201.11
StartAgents=5
ServerActive=118.190.201.11
HostnameItem=system.hostname
HostMetadata=web  #主机群组
Timeout=15
Include=/etc/zabbix/zabbix_agentd.d/*.conf
扫描之后添加那个模板及监控那些组

关联模板及组
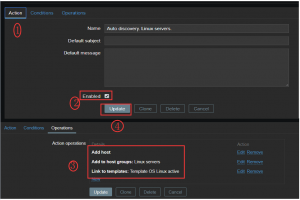
3.自动化监控主动注册
添加主机组web名称

添加链接模板

创建主动注册监控

配置条件内容如下所示

链接操作选项如下然后进行add添加

添加之后如下所示

4.低级自动发现之MySQL多实例
#安装MySQL数据库启动
yum install -y mariadb-server
systemctl enable mariadb.service
systemctl start mariadb.service
#创建MySQL多实例3307,3308
cp /etc/my.cnf /etc/my3307.cnf
cp /etc/my3307.cnf /etc/my3308.cnf
#3307,3308多实例配置文件内容
[root@linux-node2 ~]# grep '^[a-Z]' /etc/my3307.cnf /etc/my3308.cnf
/etc/my3307.cnf:datadir=/data/3307
/etc/my3307.cnf:socket=/data/3307/mysql.sock
/etc/my3307.cnf:symbolic-links=0
/etc/my3307.cnf:port=3307
/etc/my3307.cnf:log-error=/data/3307/mariadb.log
/etc/my3307.cnf:pid-file=/data/3307/mariadb.pid
/etc/my3308.cnf:datadir=/data/3308
/etc/my3308.cnf:socket=/data/3308/mysql.sock
/etc/my3308.cnf:symbolic-links=0
/etc/my3308.cnf:port=3308
/etc/my3308.cnf:log-error=/data/3308/mariadb.log
/etc/my3308.cnf:pid-file=/data/3308/mariadb.pid
#初始化多实例3306,3307数据库并启动
mysql_install_db --user=mysql --defaults-file=/etc/my3307.cnf
mysqld_safe --defaults-file=/etc/my3307.cnf &
#3308实例启动
mysql_install_db --user=mysql --defaults-file=/etc/my3308.cnf
mysqld_safe --defaults-file=/etc/my3308.cnf &
#取出MySQL端口
[root@linux-node2 ~]# netstat -lntup |grep mysqld |awk -F "[ :]+" '{print $5}'
3306
3307
3308
#编写脚本
[root@linux-node2 ~]# cd /etc/zabbix/zabbix_agentd.d/
[root@linux-node2 zabbix_agentd.d]# ls
userparameter_mysql.conf
[root@linux-node2 zabbix_agentd.d]#
[root@linux-node2 zabbix_agentd.d]# vim discovery_mysql.sh
#!/bin/bash
#mysql low-level discovery
res=`netstat -lntup |grep mysqld |awk -F "[ :]+" '{print $5}'`
port=($res)
printf '{'
printf '"data":['
for key in ${!port[@]}
do
        if [[ "${#port[@]}" -gt 1 && "${key}" -ne "$((${#port[@]}-1))" ]];then
               printf '{'
               printf "\"{#MYSQLPORT}\":\"${port[${key}]}\"},"
        else [[ "${key}" -eq "((${#port[@]}-1))" ]]
               printf '{'
               printf "\"{#MYSQLPORT}\":\"${port[${key}]}\"}"
        fi
done
printf ']'
printf '}'
#手动执行脚本
[root@linux-node2 zabbix_agentd.d]# sh discovery_mysql.sh |python -m json.tool
{
 "data": [
 {
 "{#MYSQLPORT}": "3306"
 },
 {
 "{#MYSQLPORT}": "3307"
 },
 {
 "{#MYSQLPORT}": "3308"
 }
 ]
}
#下面写一个自定义的key调用这个脚本 [root@linux-node2 ~]# vim /etc/zabbix/zabbix_agentd.d/discovery_mysql.conf UserParameter=discovery_mysql,sh /etc/zabbix/zabbix_agentd.d/discovery_mysql.sh #给netstat命令添加suid权限 [root@linux-node2 ~]# which netstat /usr/bin/netstat [root@linux-node2 ~]# chmod u+s `which netstat` [root@linux-node2 ~]# ll `which netstat` -rwsr-xr-x 1 root root 155000 Aug 3 2017 /usr/bin/netstat #服务端执行get命令检测 [root@linux-node1 ~]# zabbix_get -s 118.190.201.12 -k discovery_mysql {"data":[{"{#MYSQLPORT}":"3306"},{"{#MYSQLPORT}":"3307"},{"{#MYSQLPORT}":"3308"}]}
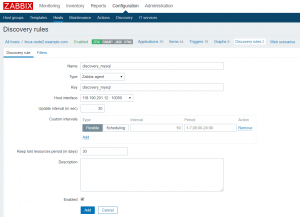
在模板里创建discovery,如下演示在现有的基础上进行添加

添加discovery规则
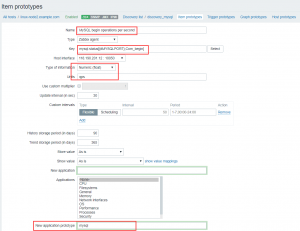
创建Item的原型

#创建对应的key值
[root@linux-node2 zabbix_agentd.d]# cat userparameter_mysql.conf
UserParameter=mysql.status[*],echo "show global status where Variable_name='$2';" | HOME=/var/lib/zabbix mysql -uroot -p123456 -h127.0.0.1 -P $1 -N | awk '{print $$2}'
#创建密码
[root@linux-node2 zabbix_agentd.d]# mysqladmin -h 127.0.0.1 -uroot password '123456' -P 3306
[root@linux-node2 zabbix_agentd.d]# mysqladmin -h 127.0.0.1 -uroot password '123456' -P 3307
[root@linux-node2 zabbix_agentd.d]# mysqladmin -h 127.0.0.1 -uroot password '123456' -P 3308
[root@linux-node2 zabbix_agentd.d]# mysql -uroot -p123456 -h 127.0.0.1 -P3306
Welcome to the MariaDB monitor. Commands end with ; or \g.
Your MariaDB connection id is 3
Server version: 5.5.60-MariaDB MariaDB Server

Copyright (c) 2000, 2018, Oracle, MariaDB Corporation Ab and others.

Type 'help;' or '\h' for help. Type '\c' to clear the current input statement.

MariaDB [(none)]> Bye
#重启服务测试
[root@linux-node2 zabbix_agentd.d]# systemctl restart zabbix-agent.service
[root@linux-node1 ~]# zabbix_get -s 118.190.201.12 -k mysql.status[3306,Com_begin]
0
[root@linux-node1 ~]# zabbix_get -s 118.190.201.12 -k mysql.status[3306,Bytes_sent]
18718
基于Key值创建样板add添加
在此基础上进行克隆

5.基于API创建主机
#获取tookiescurl -s -X POST -H 'Content-Type:application/json' -d ' { "jsonrpc": "2.0", "method": "user.login", "params": { "user": "Admin", "password": "zabbix" }, "id": 1 }' http://118.190.201.11/zabbix/api_jsonrpc.php |python -m json.tool#如下执行的命令结果[root@linux-node2 zabbix_agentd.d]# curl -s -X POST -H 'Content-Type:application/json' -d ' > { > "jsonrpc": "2.0", > "method": "user.login", > "params": { > "user": "Admin", > "password": "zabbix" > }, > "id": 1 > }' http://118.190.201.11/zabbix/api_jsonrpc.php |python -m json.tool { "id": 1, "jsonrpc": "2.0", "result": "3e1748b4eb61ace3f3811c120fe93bfc" }#获取主机列表curl -s -X POST -H 'Content-Type:application/json' -d ' { "jsonrpc": "2.0", "method": "host.get", "params": { "output": ["host"] }, "auth": "3e1748b4eb61ace3f3811c120fe93bfc", "id": 1 }' http://118.190.201.11/zabbix/api_jsonrpc.php |python -m json.tool#显示结果如下[root@linux-node2 zabbix_agentd.d]# curl -s -X POST -H 'Content-Type:application/json' -d ' > { > "jsonrpc": "2.0", > "method": "host.get", > "params": { > "output": ["host"] > }, > "auth": "3e1748b4eb61ace3f3811c120fe93bfc", > "id": 1 > }' http://118.190.201.11/zabbix/api_jsonrpc.php |python -m json.tool { "id": 1, "jsonrpc": "2.0", "result": [ { "host": "Zabbix server", "hostid": "10084" }, { "host": "linux-node2.example.com", "hostid": "10107" } ] }#下列进行API创建主机curl -s -X POST -H 'Content-Type:application/json' -d ' { "jsonrpc": "2.0", "method": "host.create", "params": { "host": "118.190.201.13", "interfaces": [ { "type": 1, "main": 1, "useip": 1, "ip": "118.190.201.13", "dns": "", "port": "10050" } ], "groups": [ { "groupid": "2" ###查看浏览器主机组的id} ], "templates": [ { "templateid": "10045" ###查看浏览器模板的id } ] }, "auth": "3e1748b4eb61ace3f3811c120fe93bfc", "id": 1 }' http://118.190.201.11/zabbix/api_jsonrpc.php |python -m json.tool
5.1使用脚本进行创建主机
#!/bin/bash
#login
url='http://118.190.201.11/zabbix/api_jsonrpc.php'
user=Admin
password=zabbix
tok=`curl -s -X POST -H 'Content-Type:application/json' -d '{"jsonrpc": "2.0","method": "user.login","params": {"user": "Admin","password": "zabbix"},"id": 1}' $url |python -m json.tool`
jsson=`echo "$tok" |grep result |awk -F '"' '{print $4}'`
#create hosts
for ip in `cat list.txt`
do
curl -s -X POST -H 'Content-Type:application/json' -d '
{
 "jsonrpc": "2.0",
 "method": "host.create",
 "params": {
 "host": "118.190.201.13",
 "interfaces": [
 {
 "type": 1,
 "main": 1,
 "useip": 1,
 "ip": "118.190.201.13",
 "dns": "",
 "port": "10050"
 }
 ],
 "groups": [
 {
 "groupid": "2" ###查看浏览器主机组的id
 }
 ],
 "templates": [
 {
 "templateid": "10045" ###查看浏览器模板的id
 }
 ]
 },
 "auth": "3e1748b4eb61ace3f3811c120fe93bfc",
 "id": 1
}' $url |python -m json.tool
done
#追加主机组
[root@linux-node2 zabbix_agentd.d]# echo 118.190.201.{20..100}|xargs -n1 >list.txt
- 转载请注明来源:Linux系列之Zabbix主动式监控
- 本文永久链接地址:https://www.xionghaier.cn/archives/811.html