
1.Vegeta介绍
什么是 Vegeta
Vegeta 是一个用 Go 语言编写的多功能的 HTTP 负载测试工具,它提供了命令行工具和一个开发库。
官方地址:https://github.com/tsenart/vegeta
2.安装 Vegeta
系统环境
[root@node ~]# cat /etc/redhat-release
CentOS Linux release 7.2.1511 (Core)
[root@node ~]# uname -r
3.10.0-327.el7.x86_64
[root@node ~]# getenforce
Disabled
[root@node ~]# systemctl status firewalld.service  ##stop的状态
Vegeta 安装非常简单,由于 Go 语言良好的跨平台性,可以直接下载官方的预编译版本后开箱即用。
- 预编译版本
存放位置在这里。
这里以 Linux 版本为例:
[root@node ~]# wget https://github.com/tsenart/vegeta/releases/download/v7.0.3/vegeta-7.0.3-linux-amd64.tar.gz
[root@node ~]# tar xzvf vegeta-7.0.3-linux-amd64.tar.gz
[root@node ~]# mv vegeta  /usr/local/bin/
如果你使用的是其它平台,可根据实际情况在官网下载页面下载对应版本解压后就可以使用。
2.1使用手册
Vegeta 用法
[root@node ~]# vegeta --help
Usage: vegeta [global flags] <command> [command flags]

global flags:
 -cpus int
 使用 CPU 的数量 (默认为 4 个)
 -profile string
 指定在执行期间启用哪个分析器,支持 cpu 和 heap。
 -version
 打印版本并退出。

attack command:
 -body string
 指定请求主体文件里的内容。
 -cert string
 指定用于 HTTPS 请求的 PEM 格式的客户端证书文件。如果 -key 未指定,它会被设置为这个标志的值。
 -connections int
 指定每个目标主机打开的空闲连接的最大数目,默认值为 10000。
 -duration duration
 指定发送请求到目标主机的时长,用 0 表示永久。
 -header value
 指定目标的请求头,可以重复指定多个请求头。
 -http2
 指定是否向支持的服务器发送 HTTP/2 请求,默认为:true。
 -insecure
 指定是否忽略无效的服务器 TLS 证书。
 -keepalive
 指定是否使用持久链接,默认值为:true。
 -key string
 指定 HTTPS 请求中使用的 PEM 编码的 SSL 客户端证书私钥文件。
 -laddr value
 指定要使用的本地 I P地址,默认值为:0.0.0.0。
 -lazy
 指定是否使用延迟模式读取目标。
 -output string
 指定输出文件的位置,默认为标准输出。
 -rate uint
 指定每秒钟对目标发送的请求数,默认值为:50。
 -redirects int
 指定每个请求的重定向的最大次数,默认为 10 次。当值为 -1, 不会遵循重定向但响应标记为成功。
 -root-certs value
 指定可信的 TLS 根证书文件,多个的情况下使用逗号分隔。如果未指定,使用系统默认的 CA 证书。
 -targets string
 指定目标文件,默认为标准输入。
 -timeout duration
 指定每个请求的超时时间,默认值为 30s。
 -workers uint
 指定初始化进程数量,默认值为 10。

report command:
 -inputs string
 指定报告输入文件,默认为标准输入。
 -output string
 指定报告输出文件,默认为标准输出。
 -reporter string
 指定要生成的报告的格式,支持 text,json, plot, hist[buckets]。默认为文本。

dump command:
 -dumper string
 指定转存文件,支持 json, csv 格式。默认为 json 格式。
 -inputs string
 指定要转存的输入文件,默认为标准输入,指定多个用逗号分隔。
 -output string
 指定要转存的输出文件,默认为标准输出。
examples:
 echo "GET http://localhost/" | vegeta attack -duration=5s | tee results.bin | vegeta report
 vegeta attack -targets=targets.txt > results.bin
 vegeta report -inputs=results.bin -reporter=json > metrics.json
 cat results.bin | vegeta report -reporter=plot > plot.html
 cat results.bin | vegeta report -reporter="hist[0,100ms,200ms,300ms]"
Vegeta 使用实例
使用标准输入进行压测并生成报告
[root@node ~]# echo "GET http://www.hi-linux.com/img/linux/docker-dry-01.png" | vegeta attack -rate=50 -connections=1 -duration=1s | tee results.bin | vegeta report
Requests [total, rate] 50, 51.02
Duration [total, attack, wait] 2.898740775s, 979.999226ms, 1.918741549s
Latencies [mean, 50, 95, 99, max] 322.863157ms, 162.816081ms, 506.116531ms, 2.22735553s, 2.30224672s
Bytes In [total, mean] 0, 0.00
Bytes Out [total, mean] 0, 0.00
Success [ratio] 0.00%
Status Codes [code:count] 0:50
Error Set:
使用目标文件的内容进行压测
- 创建 target.txt 文件,内容如下:
[root@node ~]# vim target.txt
GET http://www.hi-linux.com/
GET http://www.hi-linux.com/posts/19779.html
GET http://www.hi-linux.com/img/linux/docker-dry-01.png
- 使用 Vegeta 进行压测
[root@node ~]# vegeta attack -targets="target.txt" -rate=10 -duration=2s > results.bin
- 自定义目标文件
除了前面定义的最简单 HTTP GET 请求外,你还可以定义下面这些更灵活更复杂的 HTTP 请求:
1. 自定义请求头
GET http://user:password@hi-linux.com:80/path/to
X-Account-ID: 8675309

DELETE http://hi-linux.com:80/path/to/remove
Confirmation-Token: 90215
Authorization: Token DEADBEEF
2. 自定义请求的主体
POST http://hi-linux.com:80/things
@/path/to/newthing.json

PATCH http://hi-linux.com:80/thing/71988591
@/path/to/thing-71988591.json
3. 自定义请求头和请求主体
POST http://hi-linux.com:80/things
X-Account-ID: 99
@/path/to/newthing.json
生成压测报告
- 生成 JSON 格式的压测报告
[root@node ~]# vegeta report -inputs=results.bin -reporter=json > metrics.json
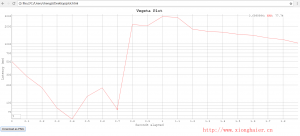
- 生成基于 Dygraphs 的 HTML 5 压测报告
[root@node ~]# cat results.bin | vegeta report -reporter=plot > plot.html
- 计算并输出一个基于文本的直方图
[root@node ~]# cat results.bin | vegeta report -reporter="hist[0,2ms,4ms,6ms]"
Bucket # % Histogram
[0s, 2ms] 0 0.00%
[2ms, 4ms] 0 0.00%
[4ms, 6ms] 0 0.00%
[6ms, +Inf] 20 100.00% ###########################################################################
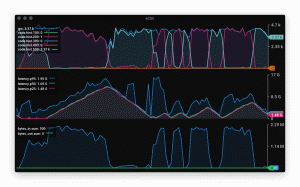
- 生成实时图形压测报告
如果您是 iTerm 用户,可以使用 jaggr 将 Vegeta 与 jplot 整合在一起并在终端上实时绘制压测报告。要实现这个功能你首先需要先安装 jaggr 和 jplot:
1. 安装 jaggr
# macOS
$ brew install rs/tap/jaggr

# 源代码安装
[root@node ~]# yum install -y go
[root@node ~]# go get -u github.com/rs/jaggr
2. 安装 jplot
# macOS
$ brew install rs/tap/jplot

# 源代码安装
[root@node ~]# go get -u github.com/rs/jplot
安装完 jaggr 和 jplot 后,其次你需要在 iTerm 中执行以下命令:
echo 'GET http://www.hi-linux.com' | \
vegeta attack -rate 50 -duration 5m | vegeta dump | \
jaggr @count=rps \
hist\[100,200,300,400,500\]:code \
p25,p50,p95:latency \
sum:bytes_in \
sum:bytes_out | \
jplot rps+code.hist.100+code.hist.200+code.hist.300+code.hist.400+code.hist.500 \
latency.p95+latency.p50+latency.p25 \
bytes_in.sum+bytes_out.sum
分布式压力测试
当进行大规模负载测试时,通常由于受限于 Vegeta 自身机器的性能瓶颈(比如:打开的文件数,内存大小,CPU 和 网络带宽)限制而无法达到预期结果。 这时分布式的使用 Vegeta 可以很好的解决这个问题,实现类似功能的工具很多,比如功能强大的 Ansible。这里我们使用 Pdsh 来实现:
$ pdsh -b -w '10.0.1.1,10.0.2.1,10.0.3.1' \
    'echo "GET http://target/" | vegeta attack -rate=20000 -duration=60s > result.bin'
Pdsh 的全称是 (Parallel Distributed Shell),Pdsh 可并行的执行对目标主机的操作,很方便的批量执行命令和分发任务。Pdsh 还支持交互模式,当要执行的命令不确定时,可直接进入 Pdsh命令行,非常方便。
完成前面的命令后,我们就可以通过 Shell 脚本将结果文件收集到的一起供后面生成报表时使用。
$ for machine in "10.0.1.1 10.0.2.1 10.0.3.1"; do
    scp $machine:~/result.bin $machine.bin &
  done
最后我们可以通过 vegeta report 命令生成此次压测的报表。vegeta report 命令可一次性读取使用逗号分隔的多个结果文件并生成报告,默认通过时间戳进行排序。
$ vegeta report -inputs="10.0.1.1.bin,10.0.2.1.bin,10.0.3.1.bin"
Requests      [total, rate]         3600000, 60000.00
Latencies     [mean, 95, 99, max]   223.340085ms, 326.913687ms, 416.537743ms, 7.788103259s
Bytes In      [total, mean]         3714690, 3095.57
Bytes Out     [total, mean]         0, 0.00
Success       [ratio]               100.0%
Status Codes  [code:count]          200:3600000
Error Set:
其它相关
如果你觉得命令行下使用 Vegeta 比较复杂的话,你还可以使用 Alex 项目。Alex 是一个基于 Vegeta Library 和 Boom 封装的压力测试 Web UI,Vegeta 提供稳定的 QPS 压力源,Boom 提供稳定的并发数压力源。
项目地址:https://github.com/ireaderlab/ale
本文借鉴于运维之美公众号
- 转载请注明来源:高性能 HTTP 负载测试工具 Vegeta
- 本文永久链接地址:https://www.xionghaier.cn/archives/415.html