
Contents
1.主机准备
安装操作系统![]()
见https://www.xionghaier.cn/archives/485.html
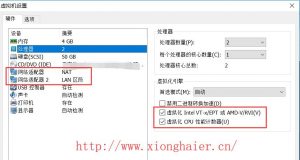
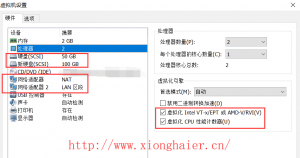
主机名称                IP地址                        服务                 描述
controller             eth0:118.190.201.11           控制节点(4G内存)    1VCPU 2G内存 一块硬盘sda50G(动态扩展)
compute1               eth0:118.190.201.31           计算节点             1VCPU 2G内存 一块硬盘sda50G(动态扩展)
备注:安装的时候网卡为eth0 eth1
1.1控制节点

1.2计算节点
2基础配置环境
#修改主机名
~]# hostnamectl set-hostname controller   ##控制节点
~]# hostnamectl set-hostname compute1     ##计算节点
#hosts解析
控制节点
[root@controller ~]# vim /etc/hosts
127.0.0.1 localhost localhost.localdomain localhost4 localhost4.localdomain4
::1 localhost localhost.localdomain localhost6 localhost6.localdomain6
118.190.201.11 controller
118.190.201.31 compute1
计算节点
[root@compute1 ~]# vim /etc/hosts
127.0.0.1 localhost localhost.localdomain localhost4 localhost4.localdomain4
::1 localhost localhost.localdomain localhost6 localhost6.localdomain6
118.190.201.11 controller
118.190.201.31 compute1
#关闭Selinux及防火墙所有节点
~]# getenforce
Disabled
~]# systemctl status firewalld.service
3本地YUM仓库搭建
见https://www.xionghaier.cn/archives/511.html
OpenStack本地YUM源配置
cd /etc/yum.repos.d/
ls
mkdir test
mv *.repo test/
vim openstack.repo
[openstack]
name=openstack
baseurl=http://118.190.201.38/repo/
gpgcheck=0
#计算节点配置
cd /etc/yum.repos.d/
ls
mkdir test
mv *.repo test/
vim openstack.repo
#从控制节点进行拷贝
scp openstack.repo 118.190.201.31:/etc/yum.repos.d/
#所有节点执行如下命令
~]# yum makecache   #缓存到本地
Loaded plugins: fastestmirror
openstack | 2.9 kB 00:00:00
(1/3): openstack/filelists_db | 465 kB 00:00:00
(2/3): openstack/other_db | 211 kB 00:00:00
(3/3): openstack/primary_db | 398 kB 00:00:00
Loading mirror speeds from cached hostfile
Metadata Cache Created
4.OpenStack安装时间服务
在控制节点上执行这些步骤
4.1安装并配置组件 -控制节点
1)安装软件包:
[root@controller ~]# yum install chrony -y
2)编辑 /etc/chrony.conf 文件,按照你环境的要求,对下面的键进行添加,修改或者删除:
[root@controller ~]# vim /etc/chrony.conf
server time1.aliyun.com iburst
删除4,5,6行内容
3)为了允许其他节点可以连接到控制节点的 chrony 后台进程,在“/etc/chrony.conf“ 文件添加下面的键:
#allow 192.168/16 修改为 allow 118/8 (IP为118.0.0.0的8为掩码地址)
或者执行如下命令:
[root@controller ~]# sed -r -i 's#server 0.centos.pool.ntp.org iburst#server time1.aliyun.com iburst#g;4d;5d;6d' /etc/chrony.conf
[root@controller ~]# sed -i '19s#.*#allow 118/8#g' /etc/chrony.conf
4)启动 NTP 服务并将其配置为随系统启动:
[root@controller ~]# systemctl enable chronyd.service
[root@controller ~]# systemctl start chronyd.service
在计算节点上执行这些步骤
其他节点会连接控制节点同步时间。在所有其他节点执行这些步骤
4.2安装并配置组件-计算节点
1)安装软件包:
[root@compute1 ~]# yum install chrony -y
2)编辑“/etc/chrony.conf“ 文件并注释除“server“ 值外的所有内容。修改它引用控制节点:
[root@compute1 ~]# sed -i '3s#.*#server controller iburst#;4d;5d;6d' /etc/chrony.conf
3)启动 NTP 服务并将其配置为随系统启动:
[root@compute1 ~]# systemctl enable chronyd.service
[root@compute1 ~]# systemctl start chronyd.service
4.3启用OpenStack库
1)安装 OpenStack 客户端
yum install python-openstackclient -y
出现如下错误:
Error: Package: python-openstackclient-2.3.1-2.el7.noarch (openstack) Requires: python-six >= 1.9.0
解决办法:
wget ftp://ftp.pbone.net/mirror/ftp.redhat.com/pub/redhat/linux/enterprise/7Server/en/RHOS/SRPMS/python-six-1.9.0-1.el7.src.rpm
yum -y instasll python2-devel
rpm -ivh python-six-1.9.0-1.el7.src.rpm
然而又出现如下错误
Warning: user mockbuild does not exist. using root
解决办法:
yum install mock
useradd -s /sbin/nologin mockbuild   #其实也创建了一个独立的mockbuild组 参考:http://blog.sina.com.cn/s/blog_743a7cfd0102veau.html
在重新安装
rpm -ivh python-six-1.9.0-1.el7.src.rpm
制作rpm安装包
yum install -y rpm-build
rpmbuild -bb rpmbuild/SPECS/python-six.spec
rpm -ivh --force rpmbuild/RPMS/noarch/python-six-1.9.0-1.el7.noarch.rpm
rpm -qa | grep python-six
重新安装OpenStack 客户端
yum install python-openstackclient -y  ##每添加一个新的节点都需执行
2)RHEL 和 CentOS 默认启用了 SELinux . 安装 openstack-selinux 软件包以便自动管理 OpenStack 服务的安全策略:
yum install openstack-selinux -y ##每添加一个新的节点都需执行
4.3.1补充说明
yum install centos-release-openstack-liberty -y
.......
出现如下错误
No package centos-release-openstack-libertyavailable.
Error: Nothing to do
解决办法
wget http://dl.fedoraproject.org/pub/epel/7/x86_64/Packages/e/epel-release-7-11.noarch.rpm
rpm -ivh epel-release-7-11.noarch.rpm    ##/etc/yum.repos.d/下生成epel-testing.repo和epel.repo
wget https://buildlogs.centos.org/centos/7/cloud/x86_64/openstack-liberty/centos-release-openstack-liberty-1-3.el7.noarch.rpm
rpm -ivh centos-release-openstack-liberty-1-3.el7.noarch.rpm
yum clean all
yum clean metadata
yum makecache
如上操作完成之后,安装验证
yum install python-openstackclient -y
yum install openstack-selinux -y
5.安装SQL数据库
大多数 OpenStack 服务使用 SQL 数据库来存储信息。 典型地,数据库运行在控制节点上。指南中的步骤依据不同的发行版使用MariaDB或 MySQL。OpenStack 服务也支持其他 SQL 数据库,包括`PostgreSQL <http://www.postgresql.org/>`
5.1安装并配置组件
1)安装软件包:
[root@controller ~]# yum install mariadb mariadb-server python2-PyMySQL -y
2)创建并编辑 /etc/my.cnf.d/openstack.cnf,然后完成如下动作:
- 在
[mysqld]部分,设置``bind-address``值为控制节点的管理网络IP地址以使得其它节点可以通过管理网络访问数据库:
[mysqld]
.....
bind-address = 118.190.201.11
- 在“[mysqld]“ 部分,设置如下键值来启用一起有用的选项和 UTF-8 字符集:
[mysqld]
...
default-storage-engine = innodb
innodb_file_per_table
max_connections = 4096
collation-server = utf8_general_ci
character-set-server = utf8
- 具体配置内容如下
[root@controller ~]# vim /etc/my.cnf.d/openstack.cnf
[mysqld]
bind-address = 118.190.201.11
default-storage-engine = innodb
innodb_file_per_table
max_connections = 4096
collation-server = utf8_general_ci
character-set-server = utf8
5.2完成安装
1)启动数据库服务,并将其配置为开机自启:
[root@controller ~]# systemctl enable mariadb.service
[root@controller ~]# systemctl start mariadb.service
2)为了保证数据库服务的安全性,运行“mysql_secure_installation“脚本。
特别需要说明的是,为数据库的root用户设置一个适当的密码。
#MySQL安全初始化
[root@controller ~]# mysql_secure_installation

NOTE: RUNNING ALL PARTS OF THIS SCRIPT IS RECOMMENDED FOR ALL MariaDB
 SERVERS IN PRODUCTION USE! PLEASE READ EACH STEP CAREFULLY!

In order to log into MariaDB to secure it, we'll need the current
password for the root user. If you've just installed MariaDB, and
you haven't set the root password yet, the password will be blank,
so you should just press enter here.

Enter current password for root (enter for none): 回车
OK, successfully used password, moving on...

Setting the root password ensures that nobody can log into the MariaDB
root user without the proper authorisation.

Set root password? [Y/n] y
New password: 密码
Re-enter new password: 确认密码
Password updated successfully!
Reloading privilege tables..
 ... Success!


By default, a MariaDB installation has an anonymous user, allowing anyone
to log into MariaDB without having to have a user account created for
them. This is intended only for testing, and to make the installation
go a bit smoother. You should remove them before moving into a
production environment.

Remove anonymous users? [Y/n] y
 ... Success!

Normally, root should only be allowed to connect from 'localhost'. This
ensures that someone cannot guess at the root password from the network.

Disallow root login remotely? [Y/n] y
 ... Success!

By default, MariaDB comes with a database named 'test' that anyone can
access. This is also intended only for testing, and should be removed
before moving into a production environment.

Remove test database and access to it? [Y/n] y
 - Dropping test database...
 ... Success!
 - Removing privileges on test database...
 ... Success!

Reloading the privilege tables will ensure that all changes made so far
will take effect immediately.

Reload privilege tables now? [Y/n] y
 ... Success!

Cleaning up...

All done! If you've completed all of the above steps, your MariaDB
installation should now be secure.

Thanks for using MariaDB!
6.NoSQL数据库
部署了 Telemetry 服务才会需要NoSQL
本次不部署
7.消息队列服务RabbitMQ
OpenStack 使用 message queue 协调操作和各服务的状态信息。消息队列服务一般运行在控制节点上。OpenStack支持好几种消息队列服务包括 RabbitMQ, Qpid, 和 ZeroMQ。不过,大多数发行版本的OpenStack包支持特定的消息队列服务。本指南安装 RabbitMQ 消息队列服务,因为大部分发行版本都支持它。如果你想安装不同的消息队列服务,查询与之相关的文档
7.1安装并配置组件
1)安装包:
[root@controller ~]# yum install rabbitmq-server -y
2)启动消息队列服务并将其配置为随系统启动:
[root@controller ~]# systemctl enable rabbitmq-server.service
[root@controller ~]# systemctl start rabbitmq-server.service
#查看启动端口"5672"
[root@controller ~]# netstat -lntup|grep '5672'
tcp          0       0  0.0.0.0:25672         0.0.0.0:*        LISTEN          16109/beam.smp
tcp6         0       0  :::5672               :::*             LISTEN          16109/beam.smp
3)添加 openstack 用户,并授权读写权限
[root@controller ~]# rabbitmqctl add_user openstack RABBIT_PASS
Creating user "openstack" ...
#用合适的密码替换 RABBIT_DBPASS。
#给``openstack``用户配置写和读权限
[root@controller ~]# rabbitmqctl set_permissions openstack ".*" ".*" ".*" #设置配置权限,可读,可写权限
Setting permissions for user "openstack" in vhost "/" ...
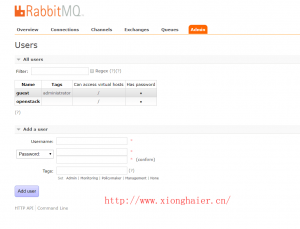
7.1.1启动RabbitMQ_Web插件,管理界面监听15672端口
[root@controller ~]# rabbitmq-plugins list
[root@controller ~]# rabbitmq-plugins enable rabbitmq_management
浏览器访问: http://118.190.201.11:15672/
1)访问RabbitMQ_SERVER_IP:15672,用户: “guest” 密码: “guest”

2)修改允许openStack用户登陆RabbitMQ消息队列服务,修改成功后退出重新登陆即可。
8.OpenStack基础服务Memcached
认证服务认证缓存使用Memcached缓存令牌。缓存服务memecached运行在控制节点。在生产部署中,我们推荐联合启用防火墙、认证和加密保证它的安全。
8.1安装并配置组件
1)安装软件包:
[root@controller ~]# yum install memcached python-memcached -y
2)编辑文件/etc/sysconfig/memcached进行修改
[root@controller ~]# sed -i 's#OPTIONS="-l 127.0.0.1,::1"#OPTIONS="-l 0.0.0.0,::1"#g' /etc/sysconfig/memcached
8.2完成配置
- 启动Memcached服务,并且配置它随机启动。
[root@controller ~]# systemctl enable memcached.service
[root@controller ~]# systemctl start memcached.service
- 关闭邮件服务,不是必须的
[root@controller ~]# systemctl stop postfix.service
[root@controller ~]# systemctl disable postfix.service
- 转载请注明来源:OpenStack系列一之基础环境
- 本文永久链接地址:https://www.xionghaier.cn/archives/505.html