
1.OpenStack服务实现阿里云ECS多Flat网络模式
1.1关闭VMware虚拟机添加网卡
~]# shutdown -h now
1.添加网卡使用仅主机模式node1跟node2

设置仅主机模式
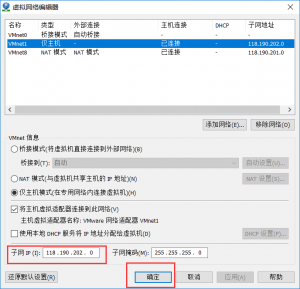
添加仅主机网卡
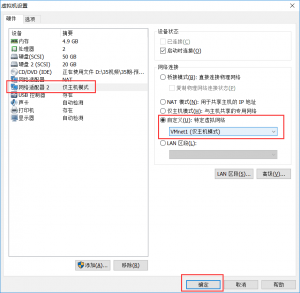
node2同理添加仅主机网卡
2.修改网卡配置信息
[root@controller ~]# cd /etc/sysconfig/network-scripts/
[root@controller network-scripts]# cp ifcfg-eth0 ifcfg-eth1
[root@controller network-scripts]# cat ifcfg-eth1
TYPE="Ethernet"
BOOTPROTO="static"
DEFROUTE="yes"
NAME="eth1"
DEVICE="eth1"
ONBOOT="yes"
IPADDR="118.190.202.11"
NETMASK=255.255.255.0
[root@controller network-scripts]# ifup eth1
[root@controller network-scripts]# ifconfig eth1
eth1: flags=4163<UP,BROADCAST,RUNNING,MULTICAST> mtu 1500
 inet 118.190.202.11 netmask 255.255.255.0 broadcast 118.190.202.255
 inet6 fe80::20c:29ff:fec1:2f1c prefixlen 64 scopeid 0x20<link>
 ether 00:0c:29:c1:2f:1c txqueuelen 1000 (Ethernet)
 RX packets 0 bytes 0 (0.0 B)
 RX errors 0 dropped 0 overruns 0 frame 0
 TX packets 12 bytes 888 (888.0 B)
 TX errors 0 dropped 0 overruns 0 carrier 0 collisions 0
#node2的网卡配置信息
[root@compute1 ~]# cd /etc/sysconfig/network-scripts/
[root@compute1 network-scripts]# cp ifcfg-eth0 ifcfg-eth1
[root@compute1 network-scripts]# cat ifcfg-eth1
TYPE="Ethernet"
BOOTPROTO="static"
DEFROUTE="yes"
NAME="eth1"
DEVICE="eth1"
ONBOOT="yes"
IPADDR="118.190.202.31"
NETMASK=255.255.255.0
[root@compute1 network-scripts]# ifconfig eth1
eth1: flags=4163<UP,BROADCAST,RUNNING,MULTICAST> mtu 1500
 inet 118.190.202.31 netmask 255.255.255.0 broadcast 118.190.202.255
 inet6 fe80::20c:29ff:fe2c:944d prefixlen 64 scopeid 0x20<link>
 ether 00:0c:29:2c:94:4d txqueuelen 1000 (Ethernet)
 RX packets 1 bytes 243 (243.0 B)
 RX errors 0 dropped 0 overruns 0 frame 0
 TX packets 13 bytes 938 (938.0 B)
 TX errors 0 dropped 0 overruns 0 carrier 0 collisions 0
1.2修改控制节点配置
编辑/etc/neutron/plugins/ml2/linuxbridge_agent.ini如下:
physical_interface_mappings = public:eth0,internal:eth1 #这是一个列表,新添加一个网卡映射关系
编辑/etc/neutron/plugins/ml2/ml2_conf.ini如下:
flat_networks = public,internal #调用上面的映射关系
重启neutron-linuxbridge-agent服务及neutron服务
[root@controller ~]# systemctl restart neutron-server.service
[root@controller ~]# systemctl restart neutron-linuxbridge-agent.service
1.3修改计算节点配置
编辑/etc/neutron/plugins/ml2/linuxbridge_agent.ini如下:
physical_interface_mappings = public:eth0,internal:eth1
重启服务
[root@compute1 ~]# systemctl restart neutron-linuxbridge-agent.service
1.4创建网络
控制节点执行
[root@controller ~]# neutron net-create --shared --provider:physical_network internal --provider:network_type flat internal-netCreated a new network: +---------------------------+--------------------------------------+ | Field | Value | +---------------------------+--------------------------------------+ | admin_state_up | True | | availability_zone_hints | | | availability_zones | | | created_at | 2018-08-06T08:15:21 | | description | | | id | 6afc74f7-8131-4ba5-962d-64fd6ffc5152 | | ipv4_address_scope | | | ipv6_address_scope | | | mtu | 1500 | | name | internal-net | | port_security_enabled | True | | provider:network_type | flat | | provider:physical_network | internal | | provider:segmentation_id | | | router:external | False | | shared | True | | status | ACTIVE | | subnets | | | tags | | | tenant_id | 7cb6cbe786bd4a28998e9f8ae3828f84 | | updated_at | 2018-08-06T08:15:21 | +---------------------------+--------------------------------------+ #创建子网[root@controller ~]# neutron subnet-create --name internal --allocation-pool start=118.190.202.100,end=118.190.202.250 --dns-nameserver 118.190.201.2 --gateway 118.190.202.2 internal-net 118.190.202.0/24Created a new subnet: +-------------------+--------------------------------------------------------+ | Field | Value | +-------------------+--------------------------------------------------------+ | allocation_pools | {"start": "118.190.202.100", "end": "118.190.202.250"} | | cidr | 118.190.202.0/24 | | created_at | 2018-08-06T15:23:08 | | description | | | dns_nameservers | 118.190.201.2 | | enable_dhcp | True | | gateway_ip | 118.190.202.2 | | host_routes | | | id | d21c9613-7f65-4eed-af10-c729efb9372b | | ip_version | 4 | | ipv6_address_mode | | | ipv6_ra_mode | | | name | internal | | network_id | 6afc74f7-8131-4ba5-962d-64fd6ffc5152 | | subnetpool_id | | | tenant_id | 7cb6cbe786bd4a28998e9f8ae3828f84 | | updated_at | 2018-08-06T15:23:08 | +-------------------+--------------------------------------------------------+
1.5登录浏览器进行查看

创建的网络Flat网络如下

启动一个实例

启动的实例

如无特殊说明,文章均为本站原创,转载请注明出处
- 转载请注明来源:OpenStack系列之实现阿里云ECS多Flat网络
- 本文永久链接地址:https://www.xionghaier.cn/archives/645.html