1.Github托管服务
其实自己部署一台Git服务器或许很有意思,但想到你要保证这台主机能够7*24小时稳定运行,还要保证各种权限及版本库的安全就觉得很累吧,

 Github顾名思义是一个Git版本库的托管服务,是目前全球最大的软件仓库,拥有上百万的开发者用户,也是软件开发和寻找资源的最佳途径,Github不仅可以托管各种Git版本仓库,还拥有了更美观的Web界面,您的代码文件可以被任何人克隆,使得开发者为开源项贡献代码变得更加容易,当然也可以付费购买私有库,这样高性价比的私有库真的是帮助到了很多团队和企业。
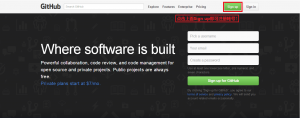
大多数用户都是为了寻找资源而爱上Github的,首先进入网站,点击注册(Sign up):
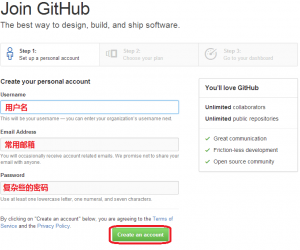
 填写注册信息:
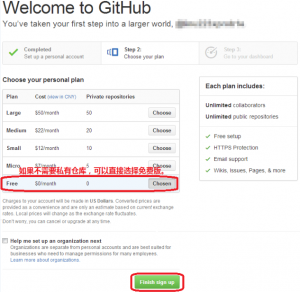
 选择仓库类型:
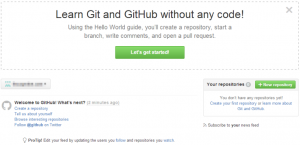
 我们的GitHub帐号注册完成了:
 我们在向Github推送文件时,可以选择SSH协议模式,在本机生成密钥文件(上面实验已经做过,就不需要再生成了):
[root@linuxprobe ~]# ssh-keygen
Generating public/private rsa key pair.
Enter file in which to save the key (/root/.ssh/id_rsa):
Created directory '/root/.ssh'.
Enter passphrase (empty for no passphrase):
Enter same passphrase again:
Your identification has been saved in /root/.ssh/id_rsa.
Your public key has been saved in /root/.ssh/id_rsa.pub.
The key fingerprint is:
88:91:4c:db:85:b6:b4:69:ba:44:4d:b1:89:da:48:78 root@linuxprobe.com
The key's randomart image is:
+--[ RSA 2048]----+
|    . .o.        |
| . o ==+         |
|. E *=++         |
| o +.o*.         |
|  o.oo. S        |
|    o            |
|   . .           |
|    .            |
|                 |
+-----------------+
[root@linuxprobe ~]# ssh-add
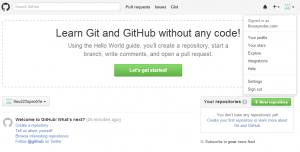
点击进入Github的帐户配置页面:
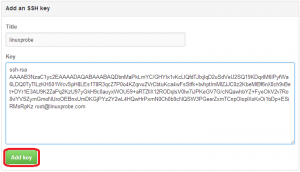
 点击添加SSH公钥:
 将本机中的ssh公钥(.ssh/id_rsa.pub)复制到页面中,填写ssh公钥信息:
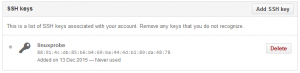
 查看ssh公钥信息:
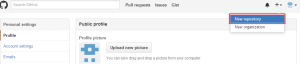
 现在我们的准备工作已经妥当,让我们在Github上创建自己第一个Git版本仓库吧,点击创建一个新的版本仓库:
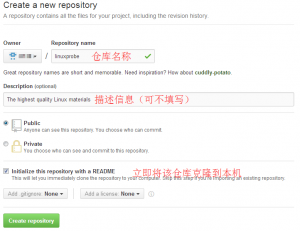
 填写版本仓库的信息:
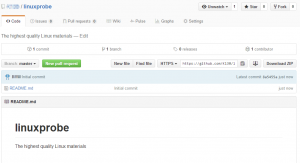
 创建成功后会自动跳转到该仓库的页面:
 复制版本仓库的克隆地址:
 尝试把版本仓库克隆到本地(这个版本库我会一直保留,大家可以动手克隆下试试。):
[root@linuxprobe ~]# git clone  https://github.com/K130/linuxprobe.git
Cloning into 'linuxprobe'...
remote: Counting objects: 3, done.
remote: Total 3 (delta 0), reused 0 (delta 0), pack-reused 0
Unpacking objects: 100% (3/3), done.
[root@linuxprobe ~]# cat linuxprobe/
.git/      README.md
[root@linuxprobe ~]# cat linuxprobe/README.md
# linuxprobe
The highest quality Linux materials
将该Github版本仓库添加到本机的远程列表中:
[root@linuxprobe linuxprobe]# git remote add linuxprobe git@github.com:K130/linuxprobe.git
[root@linuxprobe linuxprobe]# git remote
linuxprobe
origin
编写一个新文件:
[root@linuxprobe ~]# cd linuxprobe/
[root@linuxprobe linuxprobe]# echo "Based on the RHEL&Centos system" > features
将该文件提交到本地的Git版本仓库:
[root@linuxprobe linuxprobe]# git add features
[root@linuxprobe linuxprobe]# git commit -m "add features"
然后将本地的Git仓库同步到远程Git服务器上(第一次请加上参数-u,代表关联本地与远程):
[root@linuxprobe linuxprobe]# git push -u linuxprobe  master
Counting objects: 4, done.
Delta compression using up to 4 threads.
Compressing objects: 100% (2/2), done.
Writing objects: 100% (3/3), 303 bytes | 0 bytes/s, done.
Total 3 (delta 0), reused 0 (delta 0)
To git@github.com:K130/linuxprobe.git
   8a5455a..f1bc411  master -> master
Branch master set up to track remote branch master from linuxprobe.
刷新一下Web页面,果然看到版本仓库已经同步了:

- 转载请注明来源:Git系列之Github托管服务
- 本文永久链接地址:https://www.xionghaier.cn/archives/37.html